1. Introduction
Pedestrian Routing provides users with step-by-step walking routes between a user’s current location and their requested destination. Pedestrian Routing suggests pedestrian routes to help Maps users get where they want to go more easily.
For each Pedestrian Routing task, you will be provided with a suggested walking route and you will then indicate if there are any Major Navigational Errors (MNEs) along the route.
These guidelines explain how to use the web-based Rating Tool and how to identify MNEs. You will use a combination of provided map layers (with a focus on satellite) and external resources to understand the actual, physical layout (or “ground truth”) of pedestrian routes and determine if the route you are reviewing contains errors.
The information produced from these tasks will be used for evaluation purposes only.
1.1. The Rating Tool
The web-based Rating Tool for Pedestrian Routing is where you will find specific information about each route and where you will record each of your ratings. It is divided into four sections: Step List, Map View, Route Information and Rating Questions.
The following sections explain how to use each part of the Rating Tool and introduce you to the Rating Questions for Pedestrian Routing evaluation.
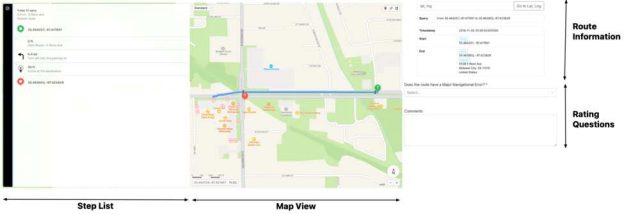
1.1.1. Step List
The Step List is located on the left side of the Rating Tool and includes:
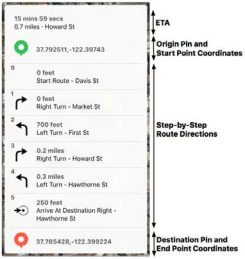 The ETA section includes an estimated time to reach the destination and the corresponding route distance. Each ETA will also include the name of the primary road that is used along the route.
The Step-by-Step Route Directions begin with a green Origin Pin, defined by Start point coordinates, and conclude with a red Destination Pin, defined by End Point coordinates. Route Directions are individually numbered and may include an arrow/icon, indicating guidance directions, as well as distances to the next maneuver, and any relevant street names. The final step for each route will indicate the orientation of the destination to the End point (ahead, left, or right).
 Individual Step IDs are located in the upper left corner of each step. When leaving a comment on a route error, you must include the Step ID and coordinates that indicate the location of the error.
The Step List is used primarily as a route reference and for understanding the directions indicated by the blue Route Line. For this reason, you will not need to evaluate the specific wording of the route guidance. For example, in some cases, you may see a step that is presented in a language that you are unfamiliar with. These cases should not be rated as errors because you should still be able to rate the route based on information and context contained within the other steps on the route.
In addition to outlining the route and individual route directions, the Step List can be used to control the appearance of the Map:
The Step List may include, but is not limited to, the following symbols:
 | The Origin Pin (User origin coordinates) |
 | The Destination Pin (User destination coordinates) |
 | Proceed forward |
 | Turn right |
 | Turn left |
 | Destination is ahead |
 | Destination is on the right |
 | Destination is on the left |
1.1.2. Map View
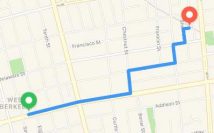 The Map View is located in the center of the Rating Tool. A blue Route Line indicates the pedestrian route between the Start and End points of the route and should reflect all of the individual Route Directions from the Step List. The green Origin Pin indicates either the user’s location when the route was requested or the location that the user requested the route to begin at. The red Destination Pin indicates the location that the user wants to navigate to.
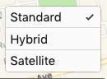
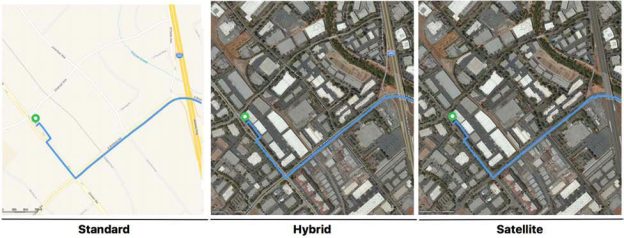
The Map View may also be toggled between Standard, Hybrid, and Satellite views. A Map Layer Selector that allows you to switch between Map Layers is located in the top left corner of the Map.
The map will default to satellite view for each task and we recommend that you perform your initial review of the route using the Satellite or Hybrid layers. Satellite and Hybrid views help to ensure that the Route Line falls correctly over routes that are safe and accessible to pedestrians. You may also be able to see where safe and legal points to cross a street are located, including crosswalks and pedestrian bridges.
In addition to the Map Selector, the Map View has several more tools that will help you to find coordinates at a selected location on the map, measure the distance between two points, zoom in and out of the map, and measure the relative distances of elements on the Map.
| Tool Icon | Name and description | |
 | Select the Pin Drop Tool and then click on the map to drop a pin. Once the pin has been placed, a flag will open that lists the pin’s Address and Coordinates (latitude and longitude). Select ‘Delete Pin’ from the pin flag to toggle it off. |  |
 | Select the Measure Tool and then click on two points on the Map. Once two points have been selected, a dashed line will be drawn between those points and the measurement, determined in meters, will appear next to the Measure Tool icon. Select the Measure Tool again to toggle it off. |  |
 | A Zoom Controller allows zooming in and out of the Map View. You can change the zoom level by clicking the + (zoom in) or – (zoom out) buttons. | |
1.1.2.1. The Pedestrian Route Line and Sides of the Street
The Pedestrian Route Line is a blue line that corresponds to the pedestrian route and connects the route’s Start and End Points, which are fixed points at each end of the blue line. In this evaluation, you will identify the presence of Major Navigational Errors (MNEs) by reviewing the safety and legality of each step that a pedestrian will need to perform in order to follow the route indicated by the blue line.
The Route Line is usually drawn down the middle of each Step of a route. Though the blue line may appear to be in the center of roads and streets, we do not expect pedestrians to walk down the middle of vehicular roads. Instead, the Route Line is provided as a visual reference that is associated with the pedestrian sidewalks, paths, walkways, and crossings that make up the Pedestrian Route.
| Satellite view | Standard Map View |
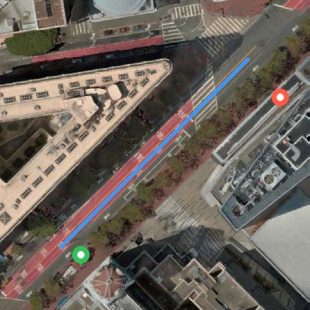 |  |
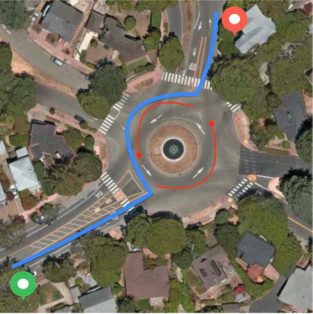
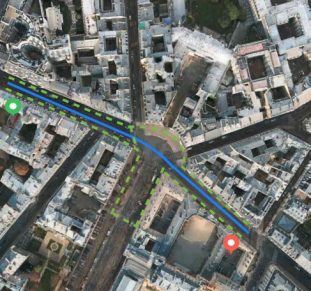
The Standard Map View (above right) illustrates the relationship between the blue Pedestrian Route Line, its fixed Start and End Points, and its associated pedestrian paths. The pedestrian walkways associated with this route run adjacent to the Route Line but they do not appear in the Satellite View (above left). Pedestrian walkways are not illustrated in the Rating Tool’s Map Views (Standard, Satellite, or Hybrid), so you will need to conduct research to understand the ground truth of pedestrian routes based on the path of the Route Line and specific Route Directions from the Step List. | |
Origin and Destination Pins – Origin and Destination Pins will also appear with each route. Though the Route Line may appear to connect the Origin and Destination Pins, the Pins are not the subject of this evaluation. This is because we assume that the Origin and Destination Pins are always acceptable to the user. For this reason, your ratings should never be based on:
Although Pins are not evaluated as part of the route, they are associated with geographical coordinates that you can use to conduct research on route locations.

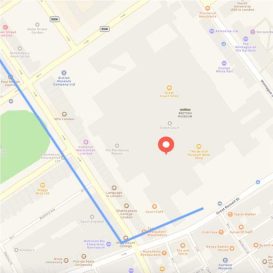
| Satellite View | Standard Map View |
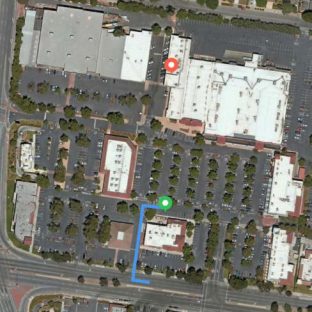 | 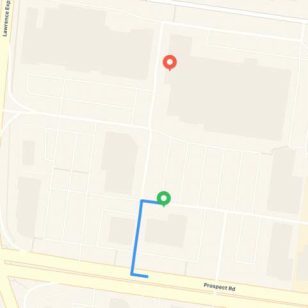 |
For example, here the route appears to move in the wrong direction from the Origin Pin and does not end near the Destination Pin. This would not be considered a Major Navigational Error because we do not evaluate the route’s relationship to the Pins. Instead, we base our evaluation on the pedestrian walkways that are associated with the Route Line. | |
Sides of the Street – Pedestrian Routes may travel along unnamed paths and trails, as well as through plazas and parks. This section describes how to evaluate paved streets with associated pedestrian walkways.
Each side of a street may differ in terms of pedestrian accessibility. For example, a road that does not allow pedestrians on one side may have a sidewalk that provides safe and legal movement on the other side. While the Route Line indicates the roads and walkways along a route, it does not specify which side of the street a pedestrian should walk along. For this reason, you should keep the following points in mind:
A pedestrian may also walk in either direction on either side of the street, as long as it is safe and legal to do so. Pedestrian movement is not effected by the direction of vehicular traffic unless signage or local laws dictate the direction of pedestrian movement.
| Satellite View | Standart map view |
 | 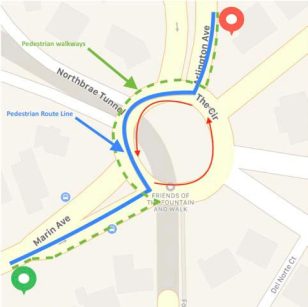 |
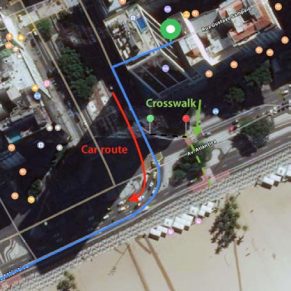
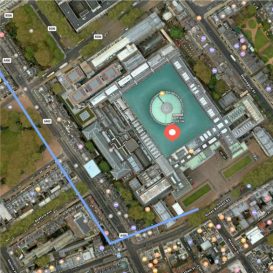
In the example above, a pedestrian route directs the user to travel counterclockwise around a traffic roundabout, against the flow of vehicular traffic (red arrows). Research, using satellite and street imagery, confirms that there are safe and legal walkways and crosswalks along this route and that there are no restrictions placed on the direction of pedestrian movement. Therefore, there are no MNEs on this route. | |
Divided Roads – In some cases, it may be possible to infer which side of the street a user is on. Routes along Divided Roads, where the directions of traffic are divided by a median, may indicate, or limit, which side of the road a user may walk along.
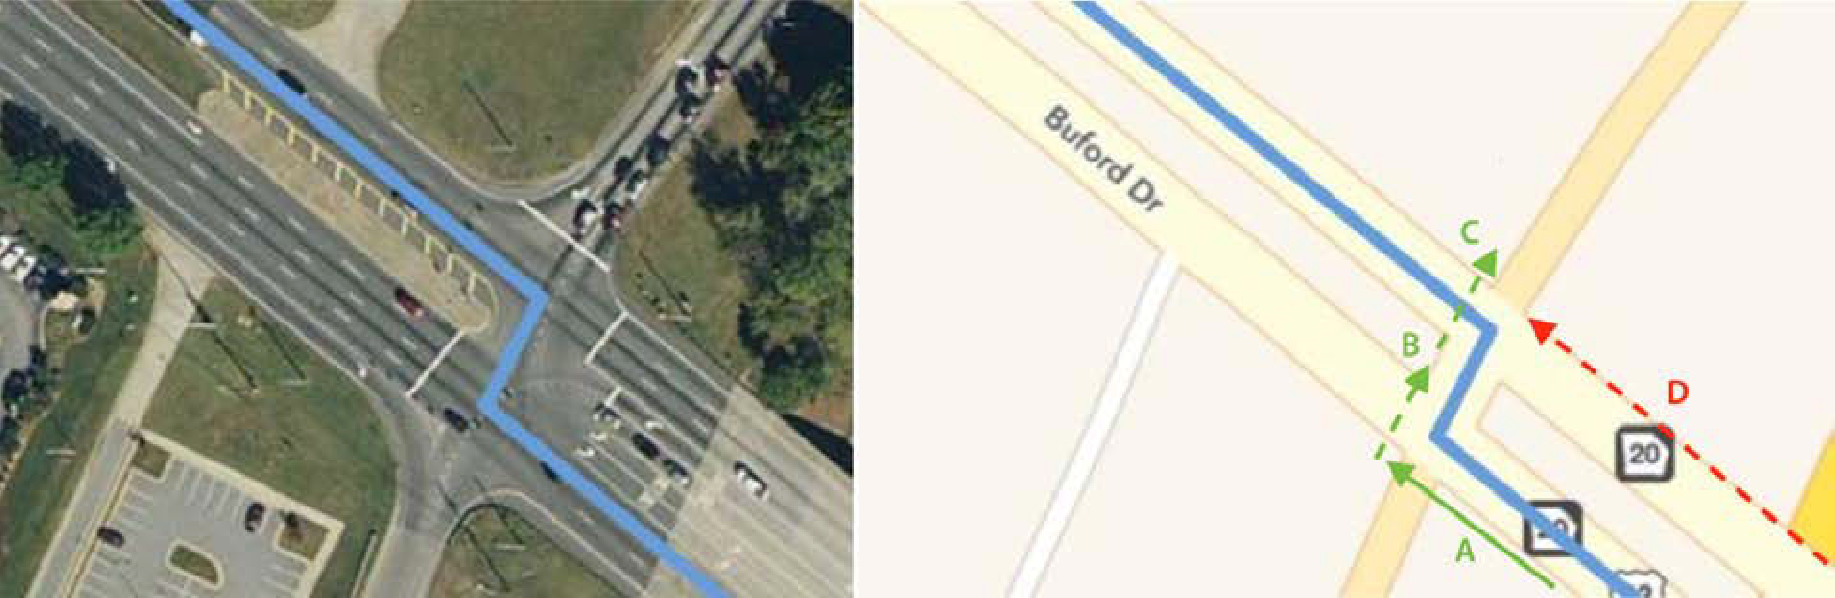
In the case above, the Route Line navigates from the South to the North side of Buford Drive, a divided road. Because we know that the user has started on the southern side of Buford Drive (A), we can infer that the user would be approaching on the southern side of the street and must either cross to the median at the indicated intersection (B) or to the northern side of the street (C). Because the route directs the user to cross to the North side of Buford Drive at this intersection, we know that the user could not have approached the intersection from the North side of the Divided Road (D).
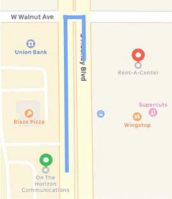 Divided Roads may also result in routes that are overly cautious. In the case shown on the right, the user begins on one side of the road and has a destination directly across the street. The road in question has a low speed and a fairly large median that a pedestrian could stand on when crossing. It’s likely quite safe for a user to have crossed the street here (although, potentially illegal under local laws). However, because the Route Line is based on road geography, the suggested route may direct the user to proceed to the intersection, cross the street, and turn back the direction they came. You should not rate this routing behavior as a MNE.
1.1.3. Route Information
Route Information is located in the upper right corner of the Rating Tool. Here you can confirm the current evaluation task type, the locale of the task, and other route-specific details:
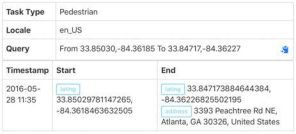
time that the user requested the route. The Timestamp (when available) can be used to help determine time-based
access restrictions, such as walking paths that open and close at a specific time each day.
This information should match the corresponding coordinates listed in the Step List.
1.1.4. Rating Questions
Your ratings and comments will be collected in the Rating Questions section, found in the lower right corner of the Rating Tool. You will answer one result-level question and provide any necessary notes in the Comments field. The result-level question requires a Yes/No response:
• Does the route have a Major Navigational Error?
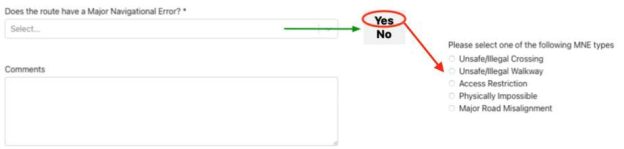
If you indicate that a route has one or more errors, by responding Yes, a checkbox list of error types will appear. Check the appropriate box and leave a comment to explain the error. In cases where multiple error types occur on the same route, check only the FIRST error which occurs along that route.
 Indicating that a route has one or more errors will also reveal a Latitude and Longitude text field. Enter the lat/ long coordinates for the location of the MNE that you identified in this field. You can use the Pin Drop Tool to find the corresponding coordinates for any location in the Map View.
If you answer Yes, you must provide a comment to explain the reasons for your rating.
1.1.5. Comments
Comments are mandatory anytime that you respond Yes to the MNE rating question. Use the comments field to explain any issues that influenced your ratings. Be sure to:

2. Rating Questions
In this task, you are asked a single primary question:
• Does the route have a Major Navigational Error?
The following sections define the MNE error types and the rules used to answer this question.
2.1. Major Navigational Errors (MNEs)
If you notice any of the following Major Navigational Errors (MNEs) when reviewing the route, you should select Yes for the question, “Does the route have a Major Navigational Error?”
Some routes may have multiple Major Navigational Errors. Use the provided checkboxes to indicate only the FIRST error that occurs along the route. Enter the lat/long coordinates for the location of the MNE in the MNE lat/long text field. You may stop reviewing a route after you find a single Major Navigational Error.
2.1.1. Unsafe/Illegal Crossing
Any street that a user is required to cross must be safe and legal to cross. Crosswalks, or other safe and legal areas to cross the street, including underground walkways, should be within 50 meters of the nearest pedestrian walkway or an intersection on the route.
To measure the distance between a pedestrian walkway and the nearest crosswalk, use the Measure Tool. Whenever you measure a distance in Pedestrian Routing use the Satellite or Hybrid map layers and base the measurements on the position of actual pedestrian walkways. Do not, however, use the position of the blue Route Line because it does not reflect the ground truth of the Pedestrian Route.
Satellite View | Standard Map View |
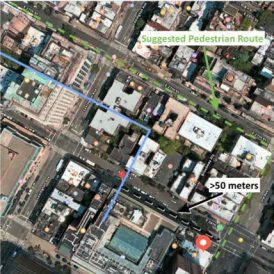
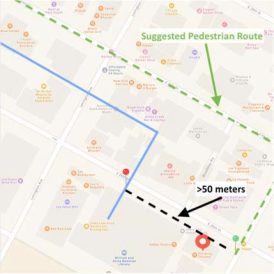
 | 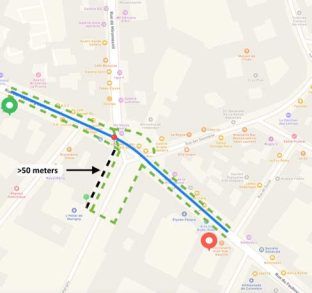 |
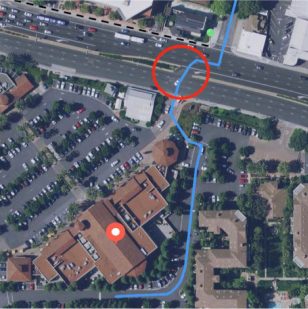
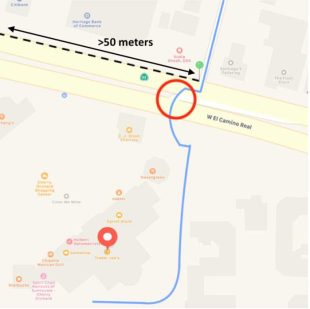
In the example above, the Route Line travels east through an intersection (left to right). On the South side of the street the user would be required to turn right at the intersection and walk more than 50 meters to a crosswalk. Measuring from a point on the sidewalk nearest the Route Line to the crosswalk reveals that the user would need to walk at least 52 meters to reach the crosswalk. If this were the only walkway along the route, then this would be considered an Unsafe/Illegal Crossing MNE. Fortunately, there is a safe and legal crosswalk at the same intersection to the North side of the street, where the user can continue the route safely, so there is no MNE on this route. The Standard Map View (above right) illustrates the relationship between the Route Line, the pedestrian walkways (green dashed line), and the measurement from the intersection to the crosswalk. Note that the Route Line serves primarily as a reference, but the measurement is based on actual pedestrian walkways and not on the specific location of the Route Line. Note: Measurement annotations above are presented on the Standard Map View for ease of viewing, but measurements should be based on ground truth imagery in Satellite or Hybrid Views. | |
In many locales, pedestrians are legally allowed to cross the street at marked and unmarked crosswalks, as well as at non-intersection areas of the street. You may need to conduct additional research to verify your locale’s laws regarding crossing at unmarked crosswalks and/ or at non-intersection areas of the street.
If you are unable to determine if a road crossing is safe, a road that meets both of the following conditions may be considered to be pedestrian friendly:
If a road violates either condition, you should look for additional evidence that the crossing is safe. Common indications include crosswalks, pedestrian crossing signs, or a pedestrianspecific feature like a pedestrian bridge. There may also be more subtle indications, such as wheelchair accessible curb ramps that are usable in the direction of travel.
Road safety and legality requirements will differ from locality to locality. When rating, you should use your local knowledge of safety expectations and perform research on laws, whenever necessary, to verify legality.
Satellite View | Standard Map View |
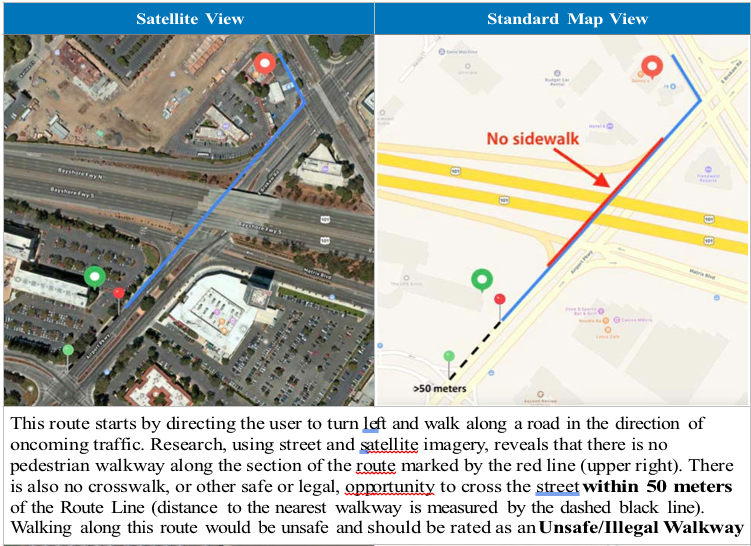
 |  |
On this route, the pedestrian is directed to cross a street where there are 6 lanes of traffic and no crosswalk. The route is also mapped through a vehicular turn lane. Since there is no crosswalk, or other safe and legal space to cross the street, within 50 meters of this point, this should be considered an Unsafe/Illegal Crossing. | |
Satellite View | Standard Map View |
 | 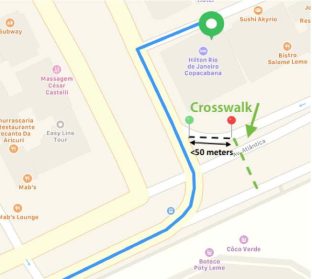 |
In this example, the route follows the road through an intersection that is intended for vehicular traffic. However, using Hybrid satellite imagery (left) we can confirm that a legal pedestrian crosswalk is located within 50 meters of an intersection on the route, so we would not consider this to be a MNE. | |
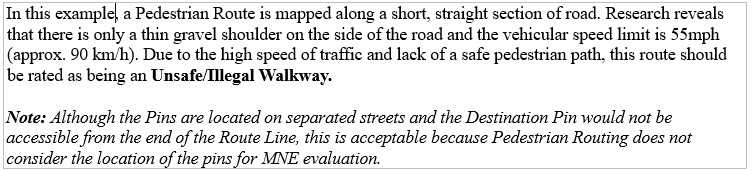
2.2.2. Unsafe/Illegal Walkway
Pedestrian routes should use walkways that are safe and legal to walk along. Common pedestrian-friendly walkways include sidewalks, pedestrian paths, underground walkways, the sides of the street on low-speed roads, and large pedestrian-friendly medians.
For low speed roads, such as neighborhoods, we can expect that it would always be safe to walk along a road regardless of the presence of a sidewalk or similar pedestrian feature. For roads with higher speeds, we expect some pedestrian-safe and legal area to walk. This pedestrian-friendly walkway can come in the form of a sidewalk, pedestrian-specific path, or a large grassy shoulder on the side of the road.
In many locales, walking along the side of very high-speed roadways is illegal. You should use your locale knowledge, or conduct research, to judge the safety and legality of the roads used.

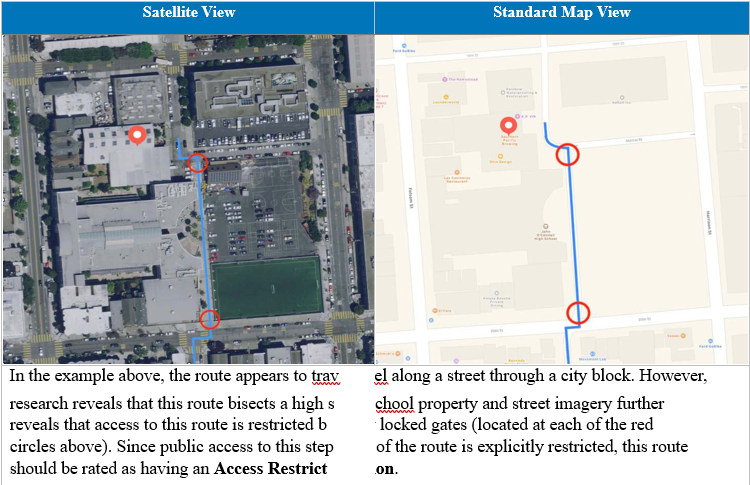
2.2.3. Access Restriction
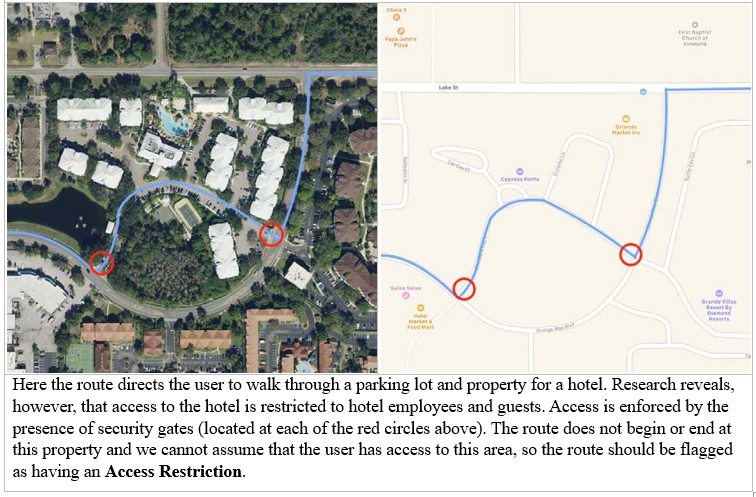
A route should be rated as having an Access Restriction if it passes through an area, including private property and indoor areas, that would typically be safe and legal for a pedestrian to use but signage or time-of-day laws prevent pedestrian usage. An Access Restriction occurs whenever a route navigates through a private road or property that are not associated with the Start or End Points on the Pedestrian Route Line.
Private Property and Gated Communities – If the route begins or ends in a private access area, it should be assumed that the user has access to that area. For example, there are many private and gated communities that only allow access to those who live within the gated community and invited guests. A route that navigates through, but does not begin or end in, a gated community is considered to have an access restriction as we cannot assume an average user would be allowed access to walk through the gated community. However, if the route begins or ends in the gated community, the assumption is that they are a resident or invited guest and that they are intentionally trying to navigate inside of the private, gated community.
Time Restrictions – Time Restrictions may occur on any step along a route, including walking trails, parking lots, and public parks. For example, in some locales, it may not be legal to route through a park at night. For time of day laws, evaluate any step that has a time restriction by referencing the time that the user would arrive at that step. Time can be determined by using the route’s Timestamp and adding all previous step durations. The initial Timestamp for each route is noted in the Route Information table in the Rating Tool.
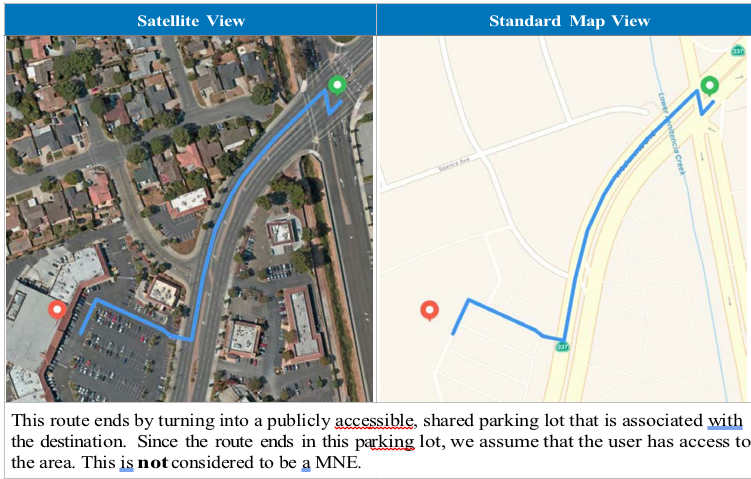
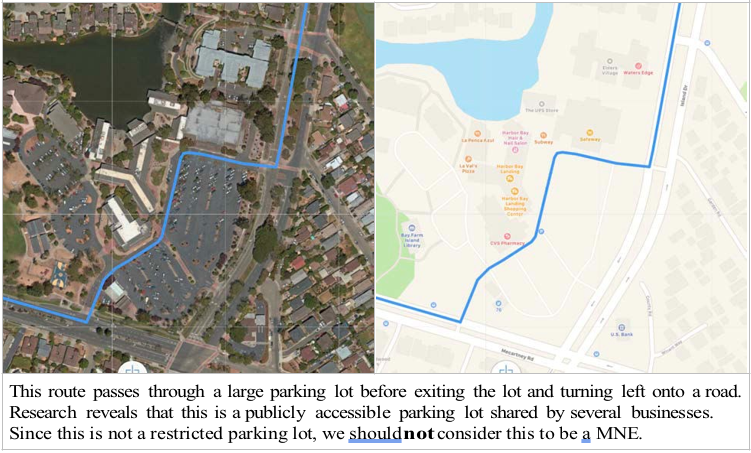
Parking Lots – Pedestrian Routes may begin, end, or travel through publicly accessible parking lots. If a Pedestrian Route travels through a parking lot, that parking lot must be safe and legal to walk through, and must not have a Time Restriction that coincides with the route’s Timestamp.
However, if a route travels through a parking lot that is located on private property and is not meant for publics use, or is otherwise not publicly accessible, MNE – Access Restricted should be selected. Non-publicly accessible parking lots include any lot that has signage, gates, or security that restrict public access, as well as paid parking garages/lots that are only intended for persons who have paid to park on the premises.

2.2.4. Physically Impossible
 The route uses walkways that do not exist in real life or provides maneuvers that are impossible to perform. For example, the route may ignore differences in walkway heights, ask the user to cross a physical barrier, or other similar impossible-to-perform actions.
In the route shown on the right, the route makes a left turn to proceed south. The Satellite View makes this case appear as if the route is navigating along a walkway that does not exist and then directly through multiple school buildings.
When we see a case like this we should review it in multiple providers and review any available street imagery. If we are unable to determine that a new walkway has been constructed, the route should receive a rating of Physically Impossible for using pedestrian paths that do not exist and indicating we should walk through a building that is not accessible to the public.
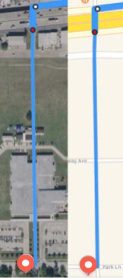
Satellite View | Standart map view |
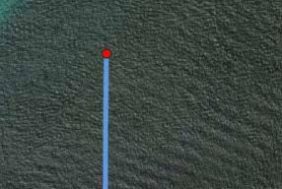 | 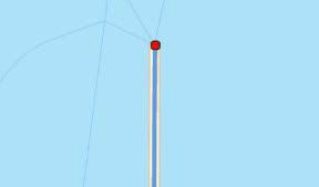 |
This route indicates that a road exists in the middle of what is clearly the ocean. After investigating the route and becoming certain that the road indicated is not actually an underwater tunnel or ferry, we can rate this as a Physically Impossible MNE for ending on a non-existing road. | |
21
2.2.5. Major Road Misalignment
A misalignment is any section of the Route Line that does not match the ground-truth shape and position of the walkways included on the route. Misalignments occur when walkways have significant errors in how they are mapped or the blue Route Line is incorrectly drawn.
Misalignments can range in severity; most cases are minor and unlikely to be noticed by a user. Only Major Road Misalignments that are likely to cause confuse a user and cause a navigational error should be rated as a Major Navigational Error.
• Any route that is more than 50 meters from the intended walkway location should be considered a Major Road Misalignment.
Satellite View | Standard Map View |
 |  |
This route line is not aligned with the Satellite or Standard Map Views. The last step on the route is more than 50 meters from the correct walkway. The route could be confusing to a user, who would not know wether to turn south on 3rd Avenue or Broadway Alley, and turning south on Broadway Alley would require that the user walk more than 50 meters to a crosswalk. Since the misalignment is more than 50 meters from the ground-truth shape and position of the route and may confuse the user, this should be considered a Major Road Misalignment. | |
Satellite View | Standard Map View |
 |  |
In this route, our line is clearly not aligned well with either road in the Satellite View. However, it’s likely that a user would not be confused. The geometry is largely the same as reality, just poorly aligned. As it is under 50 meters off and not expected to be confusing, we would not consider this to be a Major Navigational Error. | |
2.2.6 Choosing Between Multiple MNE Options
You may only indicate a single MNE option. The MNE selected should be for the first MNE found in the route and, if multiple MNEs apply in a single location, your selection should reflect the most severe error.
3. How to Review a Route
3.1. Inch-by-Inch
The best way to spot errors in a route is to follow the route from start to finish using the Satellite or Hybrid map layers.
As you inch through the route, you should keep an eye out for:
3.2. Deep Dive on Key Locations
One of the best ways to ensure route and map accuracy is to look for recent, street-level pictures of the road. The best sources of this imagery will be street imagery services. Using these services to see the road, as a user on the ground sees the road, can help you to understand the ground truth of the road, get an idea for road safety, find speed limits, etc. You are not limited to using only street imagery services as an additional source of information. Any photograph of the road, such as those on image hosting or business review websites, can be used as long as the imagery helps you understand the road as it exists today or in the recent past.
You should seek out street level imagery for any areas that look like they may not have a safe place to walk and roads that you suspect may not allow for pedestrians.
Similarly, in some cases, it can help to consult individual POI maps. For example, if the route navigates into a university or a mall and you have concerns that the satellite imagery and standard map are out of date, quickly looking to see if the university or mall offers a visitor map can be useful in helping to determine if the roads exist as shown.
This sort of research is not required for all portions of the map. However, you should examine any area that looks suspicious from your inch-by-inch review as well as step changes, as satellite imagery alone is often not sufficient to find issues with turn and access restrictions.